What is Cloud Search?
Cloud Search is a “cloud-based” scanning system that allows you to join the pool in the easiest way possible. All you have to do is create a new template, load the balance and rent the instance you want. Cloud Search is offered by third-party companies. Btcpuzzle.info site only acts as a bridge between instances.
Cloud Search allows you to start a quick scan with the instance you choose from many GPUs, from the best GPUs to old GPUs for your experience. It is offered at hourly rates and you can delete running instances whenever you want.
How does Cloud Search work?
Cloud Search works in partnership with external providers. All payments are hourly and the rental amount is deducted from your main balance as long as you keep the instance active. It is the easiest way to join the pool and is extremely simplified. It has been redesigned to be 100% compatible with Btcpuzzle.info and “btcpuzzle-client”.
How can I add balance to Cloud Search?
To top up balance to Cloud Search, visit the “Billing” page and enter the balance you want to top up by clicking the “Refill” button. An external link will be created for you to make payment. The payment system is provided by NowPayments.
You can make payments up to a minimum of $0.01. Polygon and Base are used by default as the payment network and is recommended for payment transactions. Because these networks are fixed on extremely low network transfer fees.
To pay with Bitcoin and other currencies, select "Binance Pay" payment method.
Is it possible to refund the loaded balance?
Unfortunately, the fees you pay are paid directly to third-party providers and refunds are not possible. So load up small balances and reload as you run out.
What is SSH Key? Is it necessary?
SSH is a network protocol that lets your computer log in to a server. An SSH key is what lets you log in to the instances you rent with Cloud Search. It is not necessary: without a key an instance still runs and searches, and you follow it from its logs.
You can add several keys on the SSH Keys page; one of them is your default key. Each template chooses which key its instances get: one of your keys by name, “Default key” or “No SSH key”. An instance gets exactly that one key: your other keys, and the keys of other users, are never put on it. Changing or deleting a key does not change instances that are already running.
How to create SSH key?
There are many ways to create an SSH key. We have prepared a simple guide that will allow you to create it with “PuttyGen”, one of the easiest methods. To do this, follow the steps below.
1 - Download and install PuTTY from the website. By default, the necessary applications will be installed.
2 - Run Puttygen and create a new key with the “Generate” button. Once you press the button, complete the key generation by randomly moving the mouse on the screen. Please follow the picture below for reference.
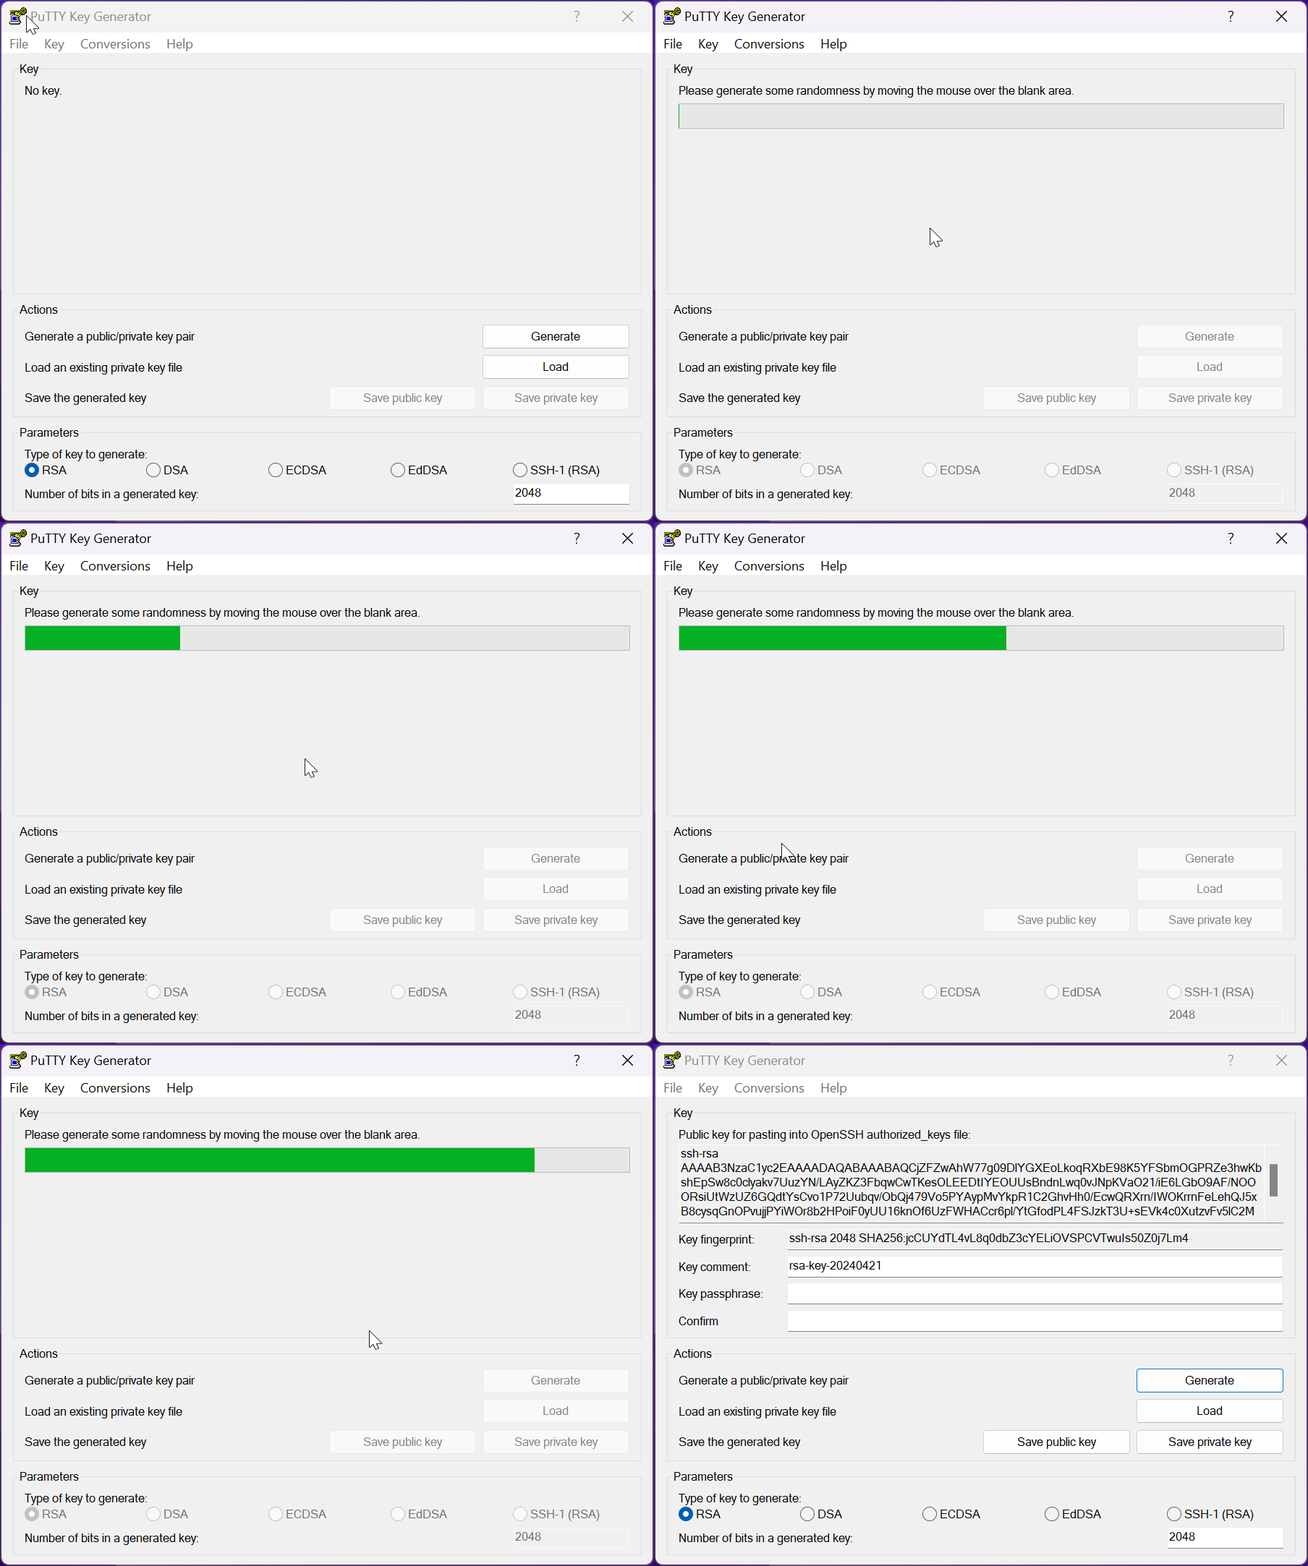
3 - Select all the text in the “Public key for pasting into OpenSSH authorized_keys file” box: one line that starts with “ssh-rsa” (or “ssh-ed25519”). On the SSH Keys page of your user center, give the key a name (for example “My laptop”), paste the text into “SSH public key” and press “Add key”. Your first key becomes your default key, which every template set to “Default key” uses. Never paste the private key anywhere: the page refuses it.
4 - Before saving the created key, you need to update the "PPK file version" to 2. To do this, while the "PuTTYgen" application is open, go to the "Key & Parameters for saving key files" menu in the menu. In this section, update the “PPK file version” value to 2 and press the “OK” button.
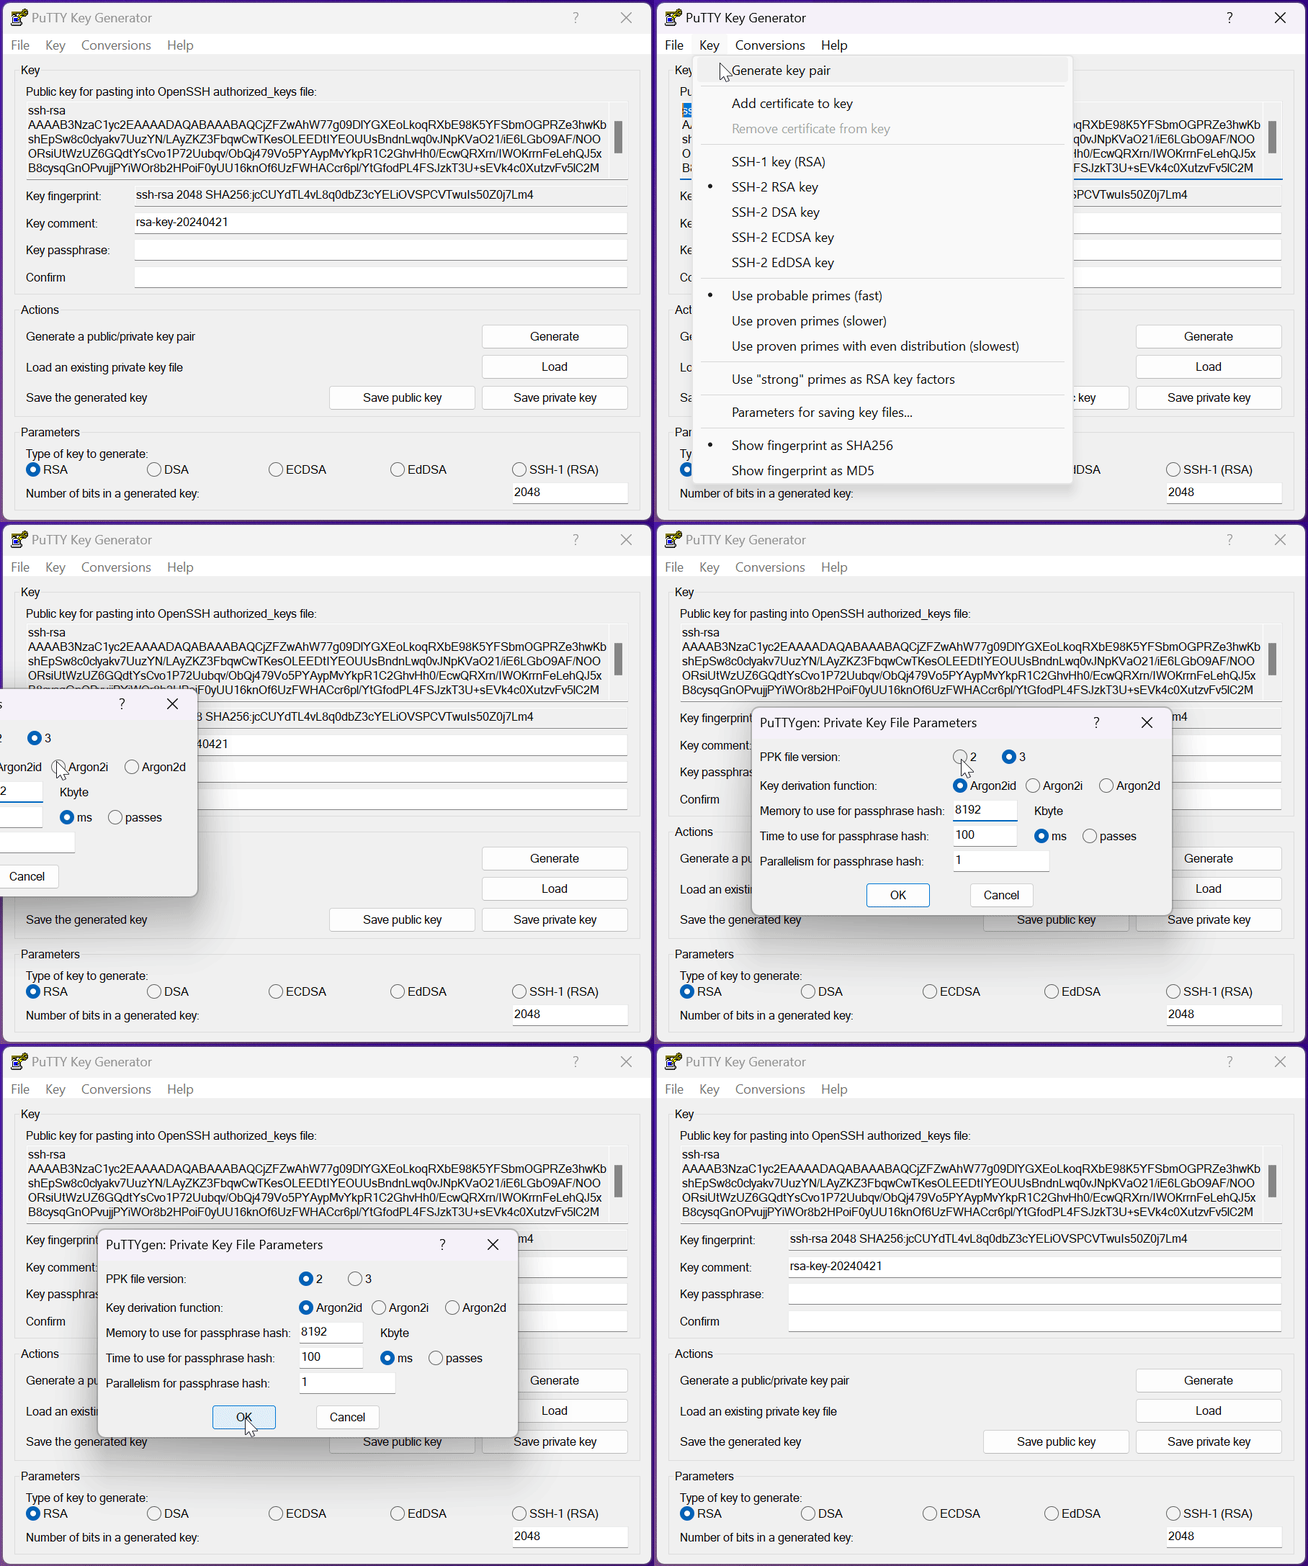
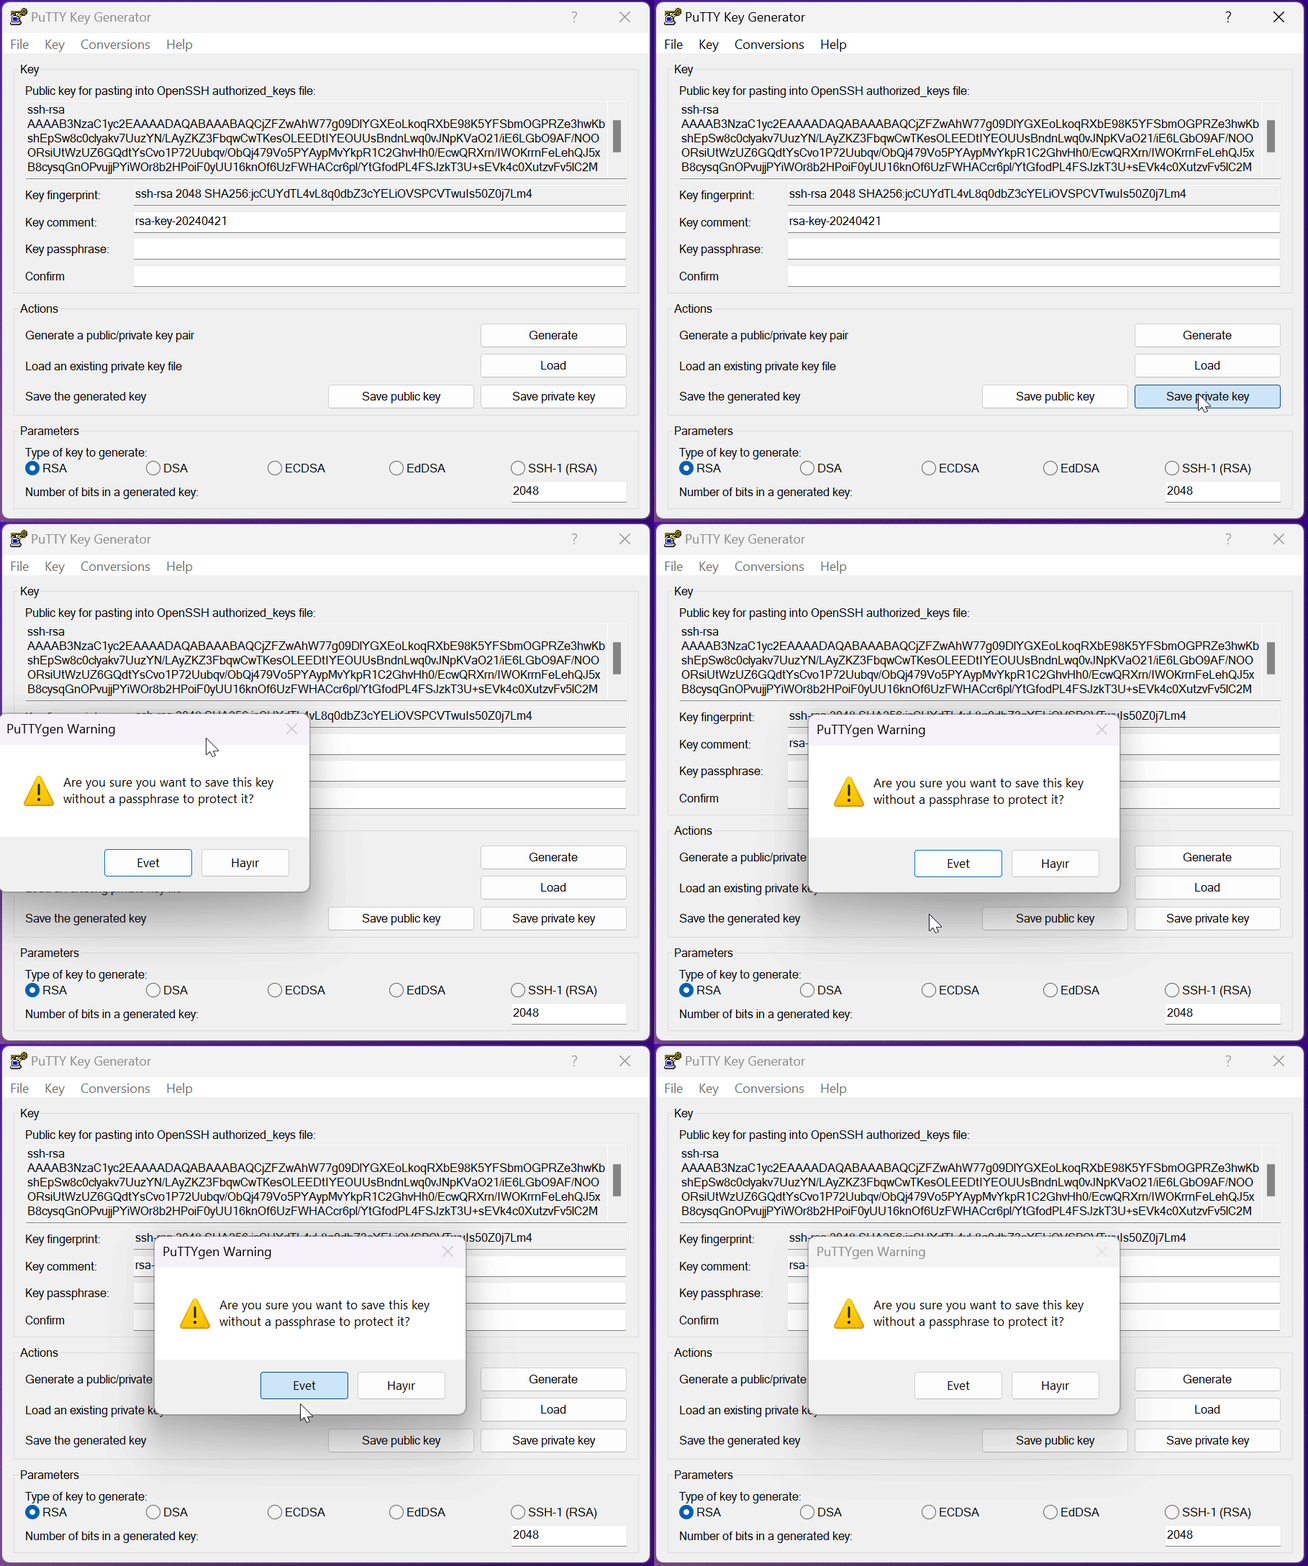
5 - Save the private key. If you wish, you can protect the private key with a password by entering a password in the "Passphrase" field and authenticate with this password when you connect to the instances. Store the private key you saved in the folder you want, it will be used when connecting to these instances.
How can I connect to an instance via SSH?
To connect to an instance via SSH, you must first create the "SSH key" in the previous title. If your SSH key is ready, we can connect. In this step, we will use Putty again and connect to an instance at btcpuzzle.info.
1 - If it is not installed, download PuTTY from the website and install it.
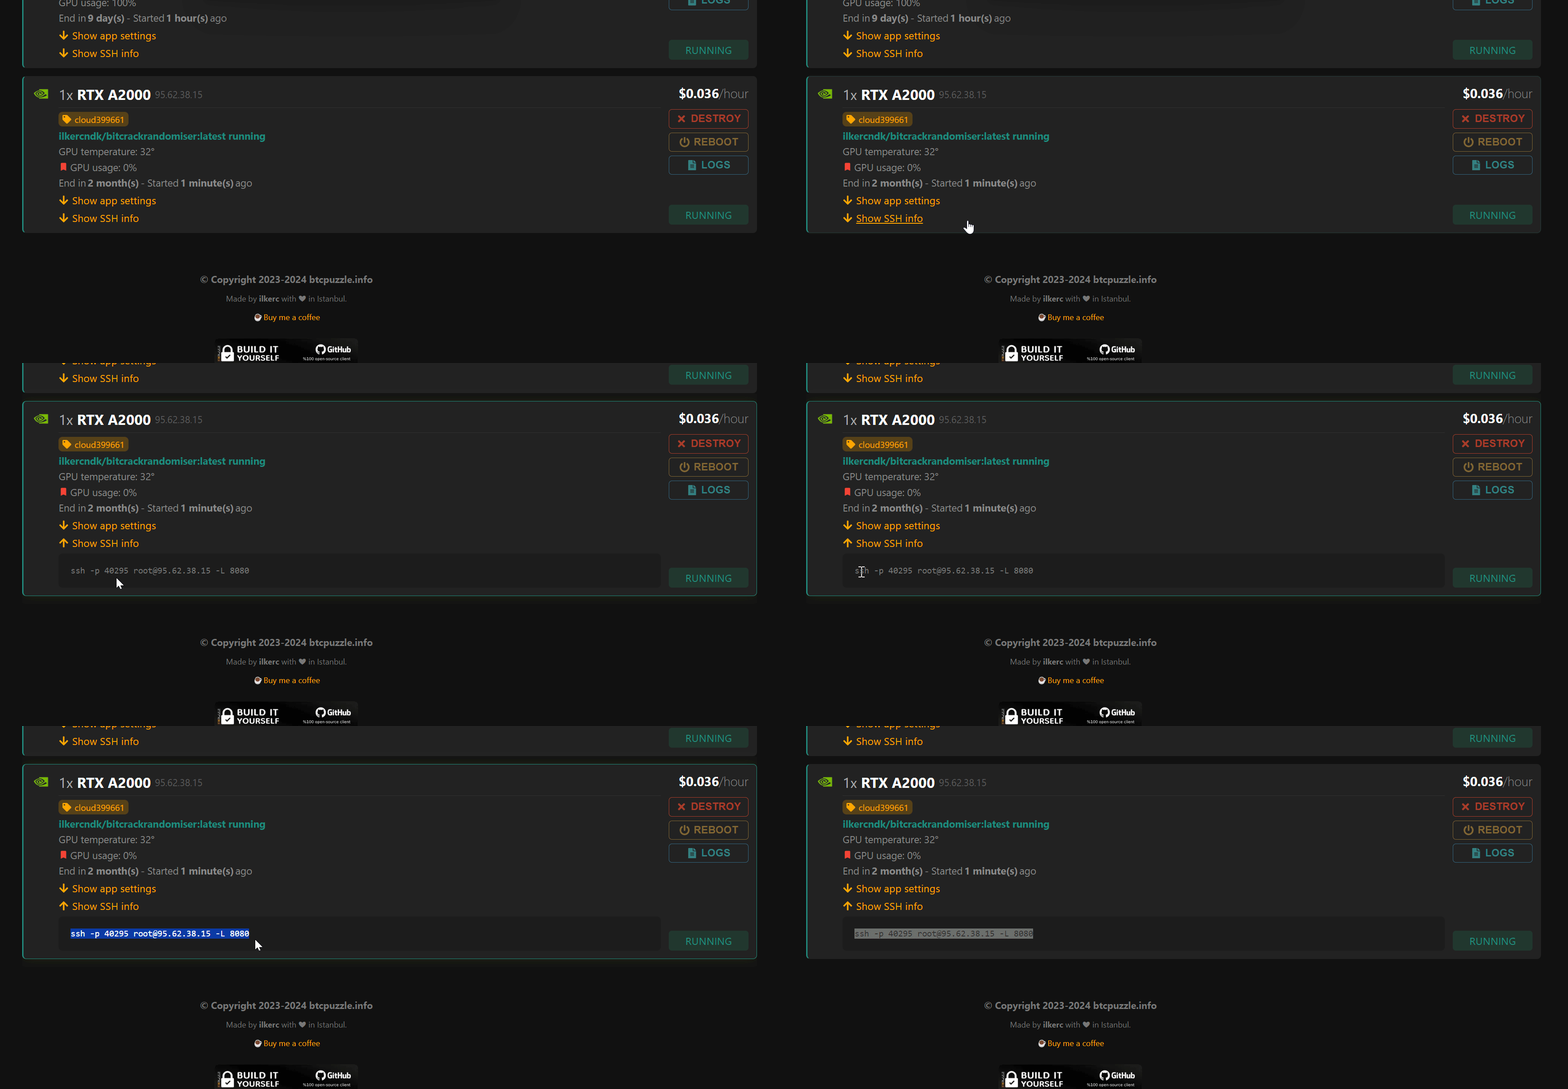
2 - Check that the template you rent with gives its instances your key: the first step of the template form has an “SSH key” choice, and the template card and the search page show which key is used. Rent an instance via Btcpuzzle.info. Wait until the instance reaches the "running" state: the key is added to the instance as it starts. When everything is ready, open “SSH info” on the instance card: it names the key and shows the SSH command with the IP and port required for the connection. A template set to “No SSH key” shows no command.
3 - Let's open the Putty application and enter the SSH connection information into the relevant “session” fields.
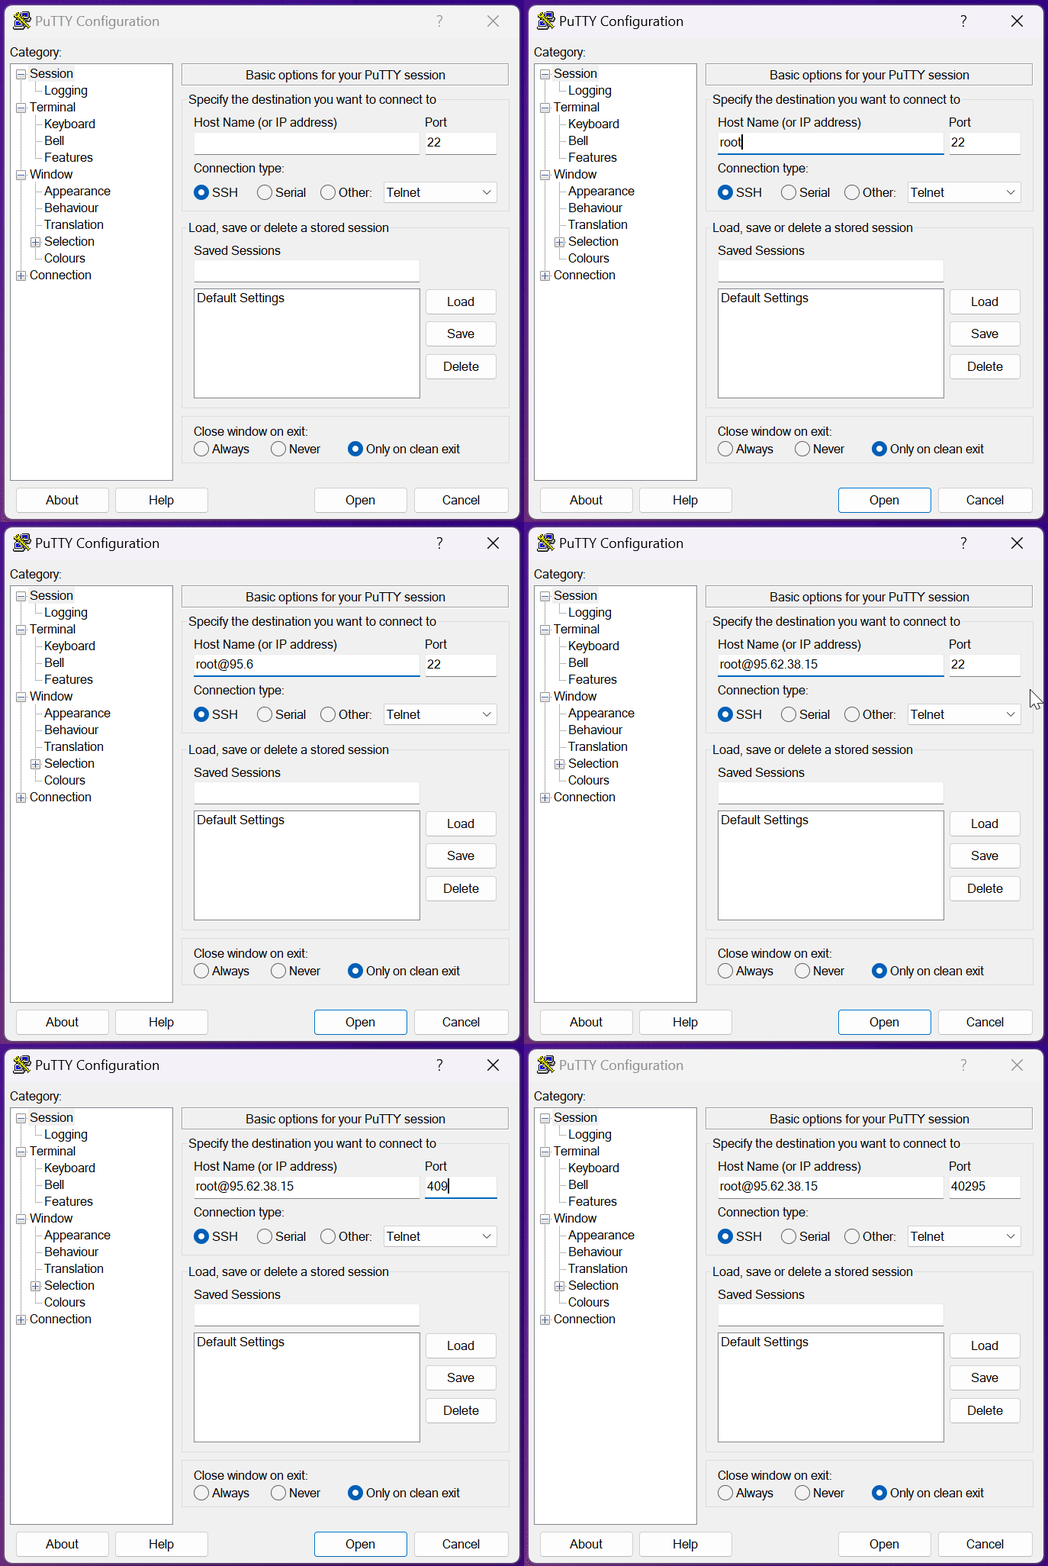
4 - Afterwards, we need to select the private key file of the SSH key we created before. To do this, go to the “Connection > SSH > Auth > Credential” menu on the left menu in Putty. From the “Private key file for authentication” field, select the private key file from the “.ppk” file type you created previously.
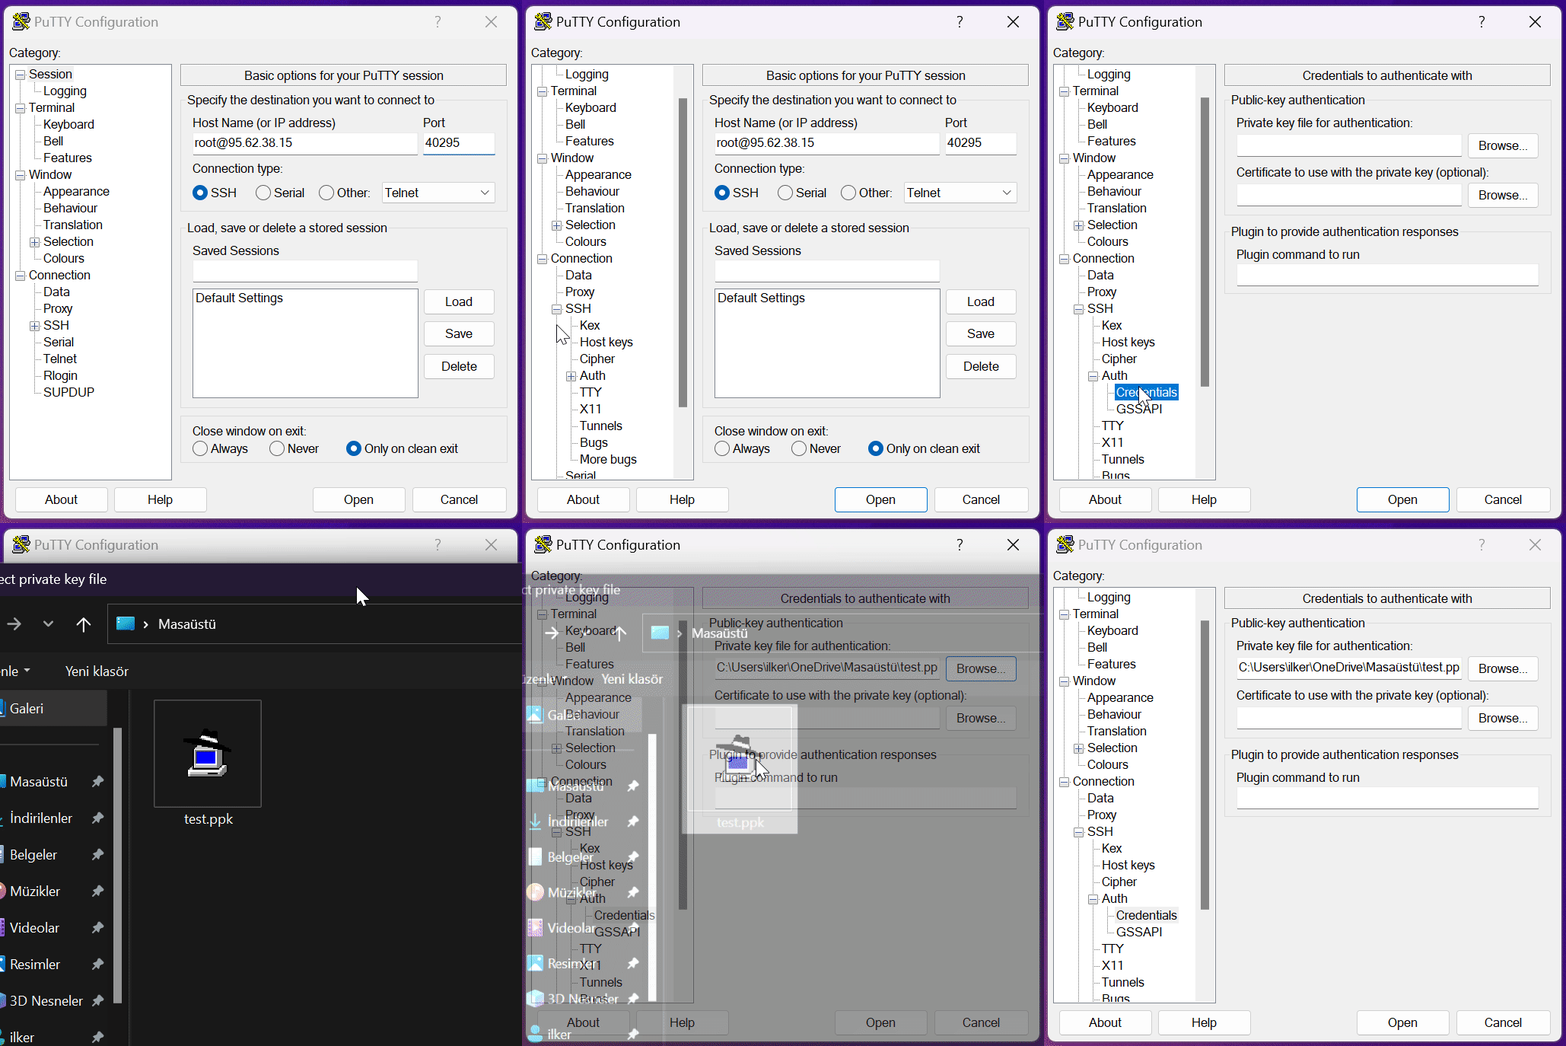
Afterwards, it connects to our instance by saying “Open”. If you have set a password for your SSH key, it will ask you to enter your password when logging in. You can now connect to the instance by entering your password.
What is a template? How is it created?
The templates in Cloud Search are an area where you can create settings for “btcpuzzle-client” and you can create as many templates as you want. Templates are used when creating instances.
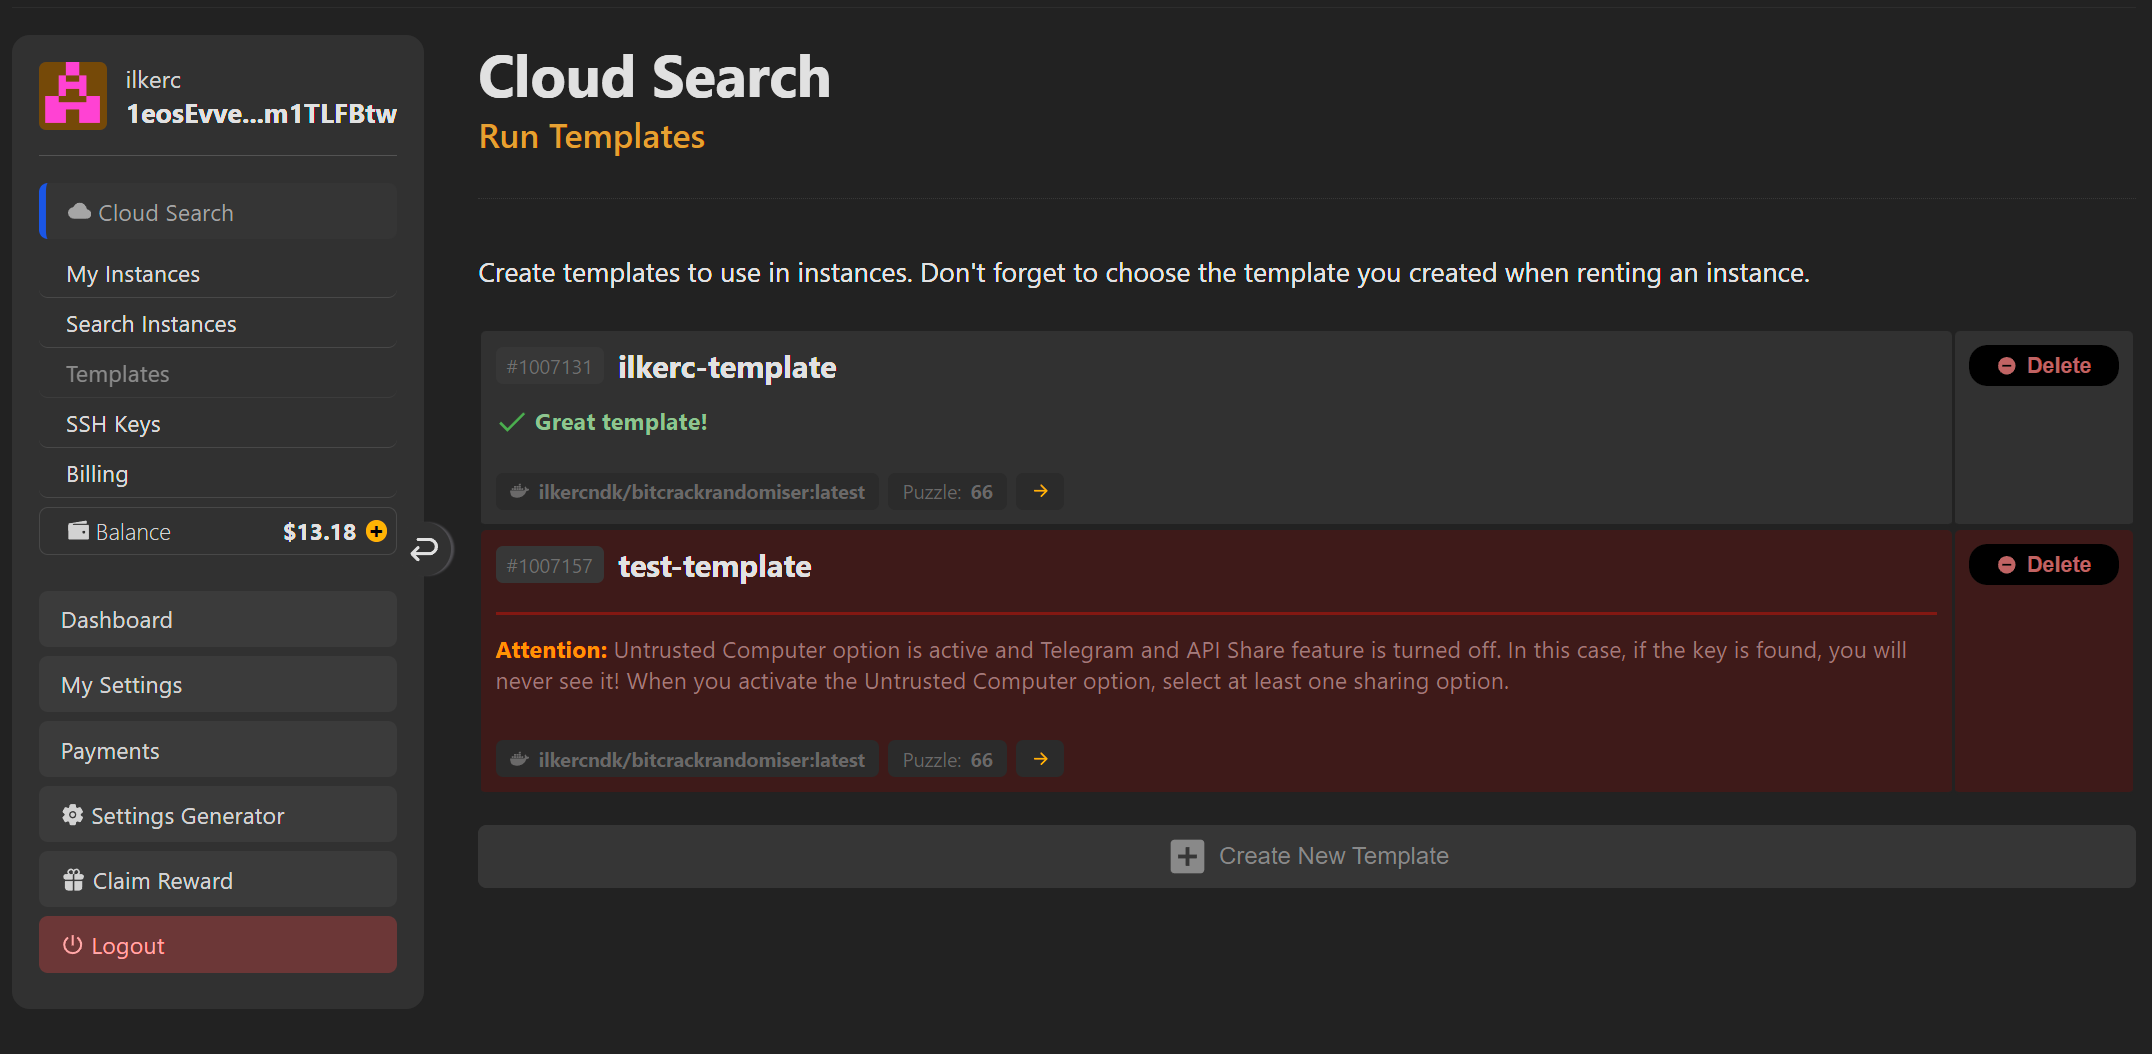
Cloud Search is equipped with various prompts to help you create the most suitable template. If you wish, you can ignore these warnings and run instances using the relevant template. The warnings stated here are for informational purposes only and are designed with the safety of inexperienced users in mind.
To create a new template, press the “New template” button and create new templates with the settings you want. By clicking on the "little question marks" next to each setting, you can examine what the relevant setting is used for.
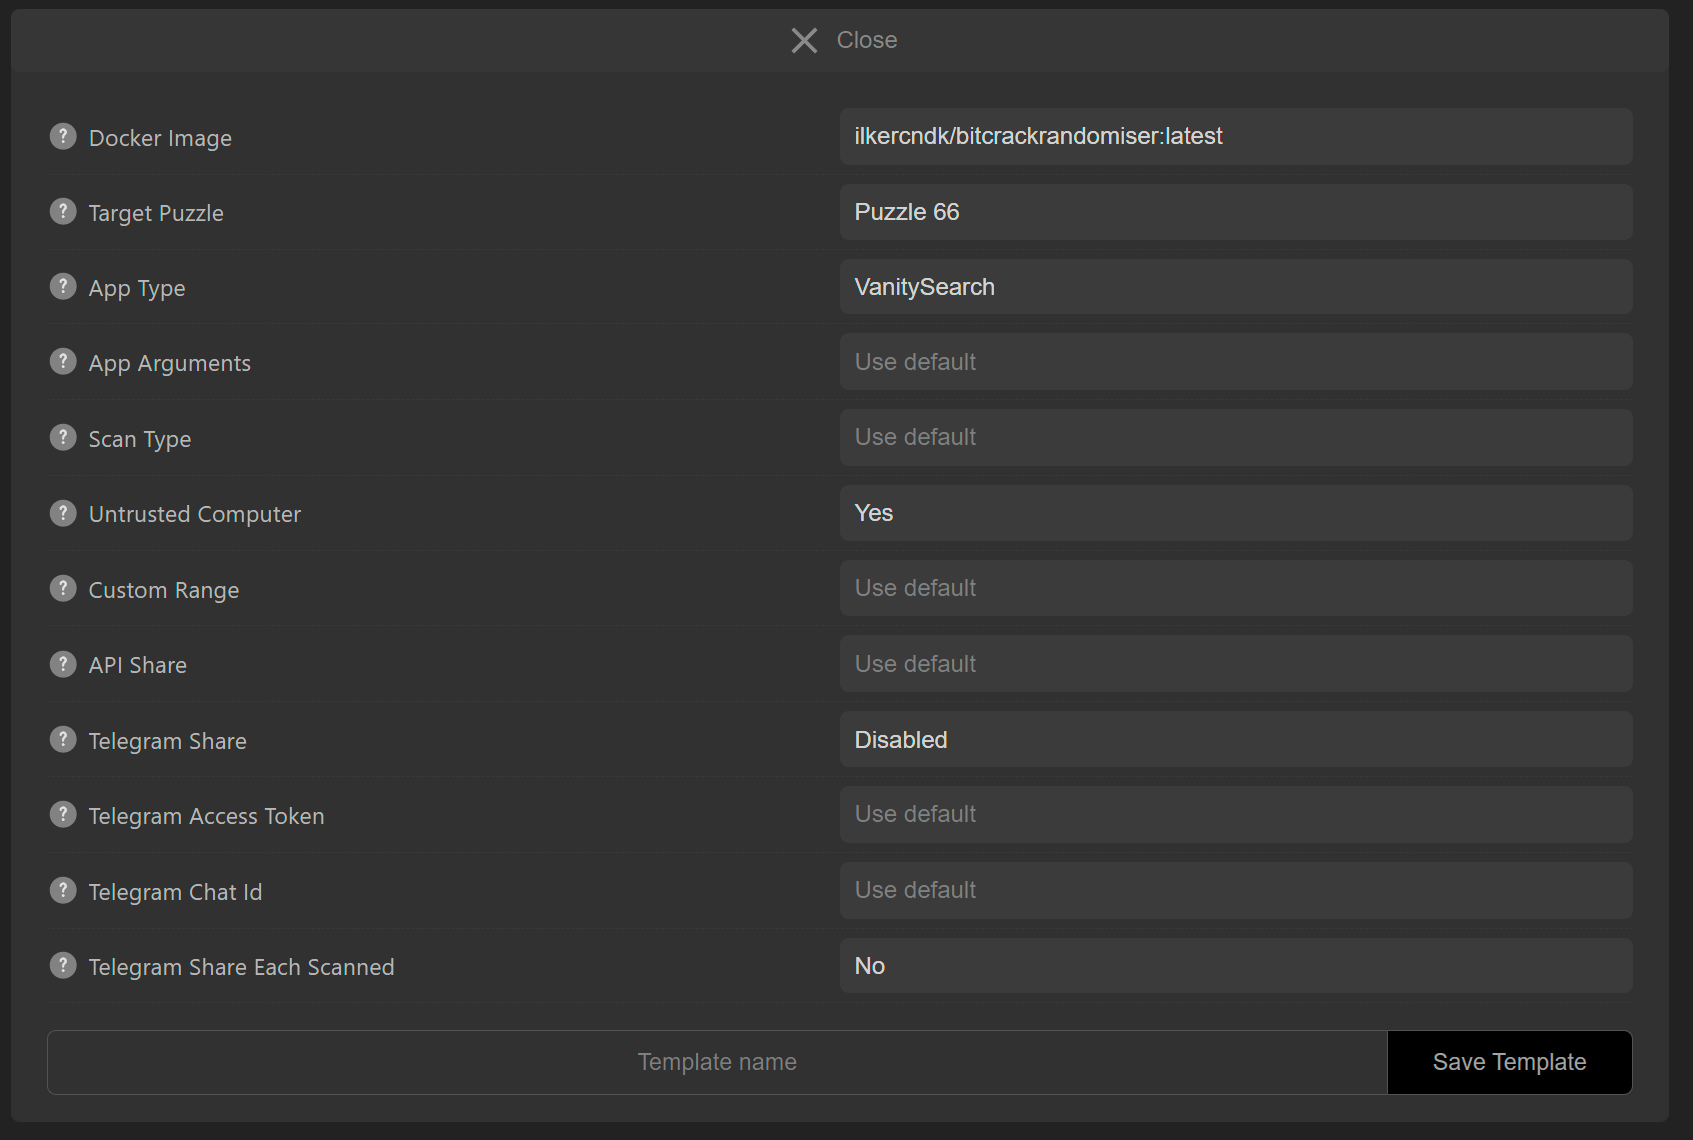
Finally, enter a template name and save the relevant template by pressing the “Save template” button. Avoid using special characters in the template name and use only the roman alphabet.
How can I start a new instance?
To create a new instance, you first need a template that you can use. You can create new instances with default settings without using a template. Scroll down to the Cloud Search page and click on the “Search Instances” link. Select the template you want to use. Then, rent the instance by clicking the "Rent" button next to any instance you want to rent.
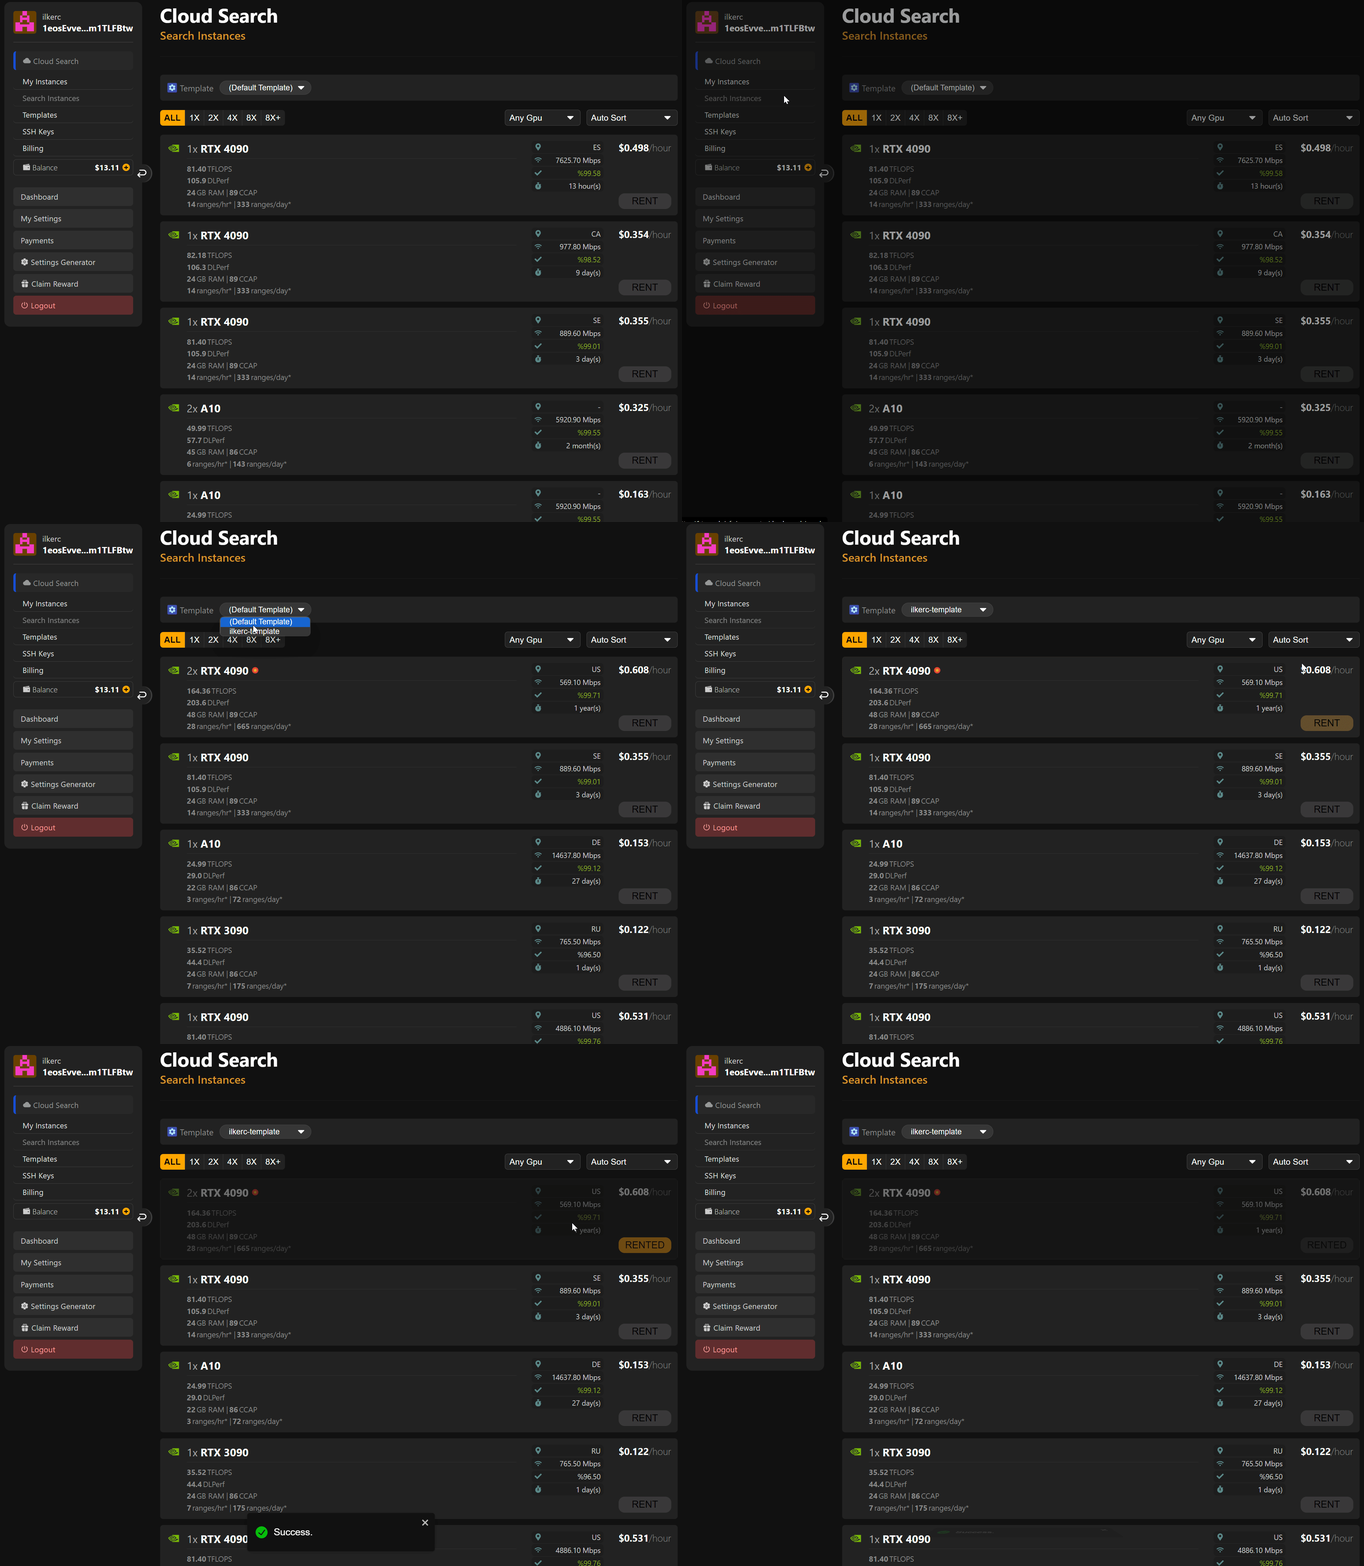
Instance is rented! You can check the instance status on the “My Instances” page.
What are instance states?
When instances are first rented, they are initialized with the "loading" status. A successfully run instance is indicated by the “running” status. If an instance experiences connection problems, it will go “offline” and no payment will be made for the instances in this state. Instances whose connection problems have been resolved will automatically run again.
Apart from this, all other situations and explanations are explained on the relevant page.
How can I make sure Instance is working correctly?
Check the following to make sure that the instance you rented is working properly and without any problems. Is the instance status "running"? If the situation is correct, look at the “logs” and verify that the application is working properly.
If there is a previously known error in the logs, it will be shown to you in the log window.
My Instance is running too slow?
Not every instance can deliver the speed it promises. Therefore, follow the power provided by the instance you are running from the logs. If the speed is abnormally low, destroy the relevant instance and rent another instance.
How can I restart Instance?
When you want to reboot an instance, simply press the "Reboot" button next to the relevant instance. Instance will be restarted.
How can I delete/destroy Instance?
If you have given up on using the instance, you can completely delete the relevant instance by clicking the "Destroy" button next to the relevant instance.
What are instance logs?
You can follow the application logs of the running instance by clicking the "Logs" button. In the logs section, you can see how the “btcpuzzle-client” application works and whether there are any problems. In addition, if instances run with default settings find the private key, they will appear in the relevant key logs section. (Not recommended method, follow next heading for recommended method)
What is the best practice in Cloud Search?
If you've decided to use Cloud Search, the first thing you need to do is create a reliable template. Since scanning with default settings will reveal the key on the running instance, you need to set up a sharing mechanism.
Always use “Untrusted computer” as “Yes” in your template. This will prevent the found key from being stored in the application console, logs and anywhere in the running instance when the key is found. The key will only come to you as you specify. It is mandatory to use the API share or Telegram share feature.
After creating the relevant template, you will be shown as a warning how reliable the template is.
Can I use my own docker image?
By default, only the “original docker image” is used in Cloud Search. However, we will update this soon so that you can use your own docker image.